|
|
|
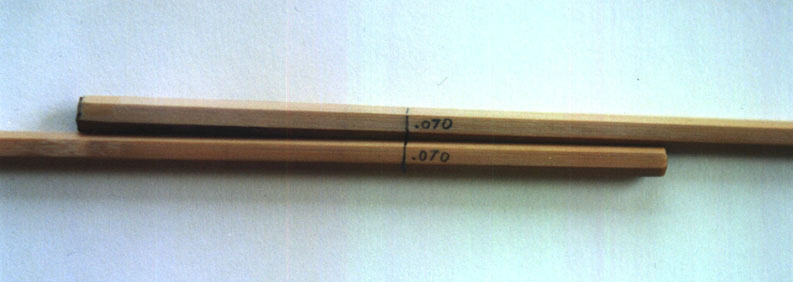
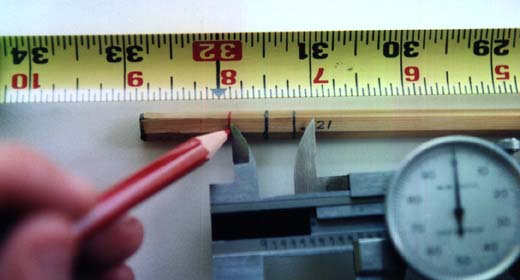
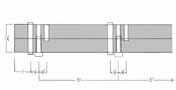
Fig. 1: Alignment of the overlapping station of two rod sections |
|
Thomas Penrose's Bamboo Fly Rod Pages
Making Split Cane Fly Rods:
Determining Ferrule Positioning on a Three-Piece Rod
When trimming individual bamboo fly rod sections to their final length prior to mounting the ferrules there are several important factors to be kept in mind. The first is that when the fly rod is disassembled, all of the sections should be the same length as one another. Secondly, when the rod is assembled, and the male ferrules are seated within the female ferrules, the fly rod should be its designated length (an 8 ft. 3 piece, for instance). Achieving these first two goals is complicated by the manner in which the addition of female ferrules effect the length of each individual rod section (female ferrules add to the overall length of mid and butt sections. Tip sections, on the other hand, only have a single male ferrule, which does not ostensibly alter its overall length).
An additional factor to keep in mind, and perhaps the most important factor of all, is that when the trimmed fly rod sections are laid out end-to-end, they should duplicate the slope of the taper that was called for by the taper sheet that was used to make the rod. For instance, when the sections of a two-piece rod have been trimmed and laid out end-to-end, the diameter of the terminal end of the tip section should be exactly the same as the diameter of the terminal end of the butt section that it joins up against. Trimming the rod sections in this manner ensures that the intended slope of the fly rod’s taper is maintained throughout its length, as if it were composed of a single continuous piece.
|
|
|
Fig. 1: Alignment of the overlapping station of two rod sections |
|
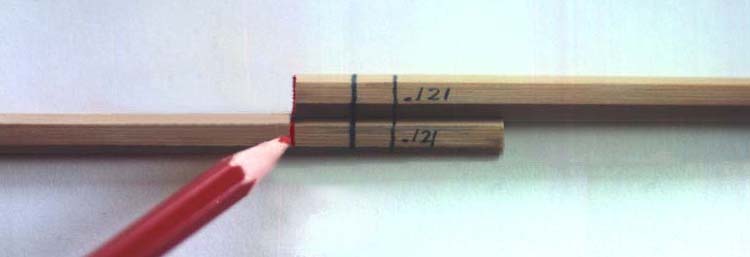
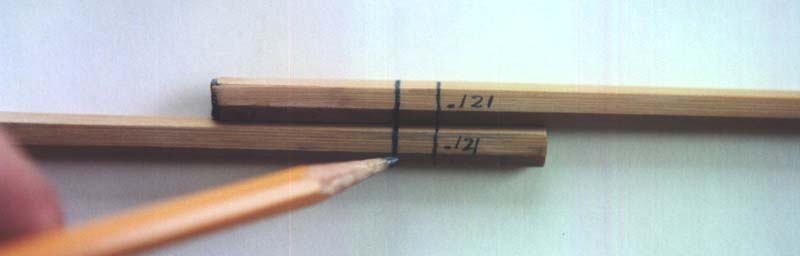
The most straightforward way to begin the process of determining where to trim your fly rod sections is to lay them out on a flat surface in such a way that their relationship to one another is the same as that called for by the taper sheet. When I make a rod I tend to make the sections oversized enough in terms of their length so that they will overlap by a single taper station. This makes it easy to orient each section relative to the taper of its mate, since one simply needs to align these station markings as shown in Fig 1. However, since many rodmakers construct rod sections that are only 1"-2" oversized, the sections do not share a taper station, and one must orient each section relative to its mate by placing the final station at the end of each section so that they are 5" from one another. By marking out the five 1" segments to indicate the distance between each of the stations, one is able to orient the strips to one another (see Fig. 2). Of course, in order to orient the strips in either of these ways it is important that there are markings on each rod section that indicate where the original planing stations were. Since the gluing, sanding, and enamel removal procedures can obliterate the station markings that you had made on each spline during final planing, you should make a note of where these occur on each section, so that they can be penciled in again if they are no longer visible after gluing. If you do not have any record of where the stations were, you must resort to using a caliper to measure each rod section in order to find the diameters on each section that correspond to the diameters on the sections they mate with.
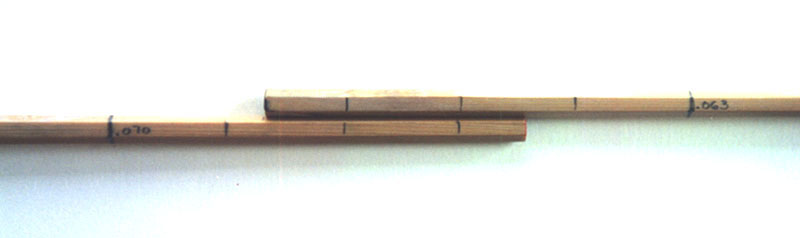 |
Fig. 2: Alignment of two sections that do not have an overlapping station |
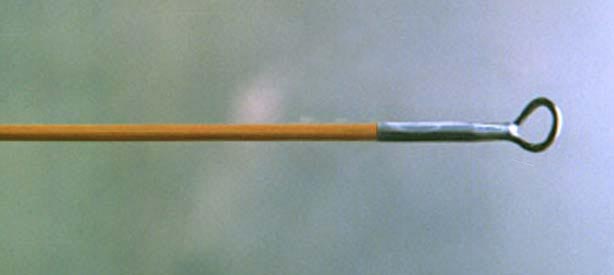
Once you have aligned each fly rod section in its proper orientation to one another, the first step of the actual trimming process is to trim the smallest end of the tip section at the first taper station marking, and then glue on the tiptop guide, as seen in Fig. 3 (you do not have to glue the tiptop on permanently at this point, but can simply tack it on with a tiny bit of ferrule cement. You are adding the tiptop now because the 1/4"-1/2" that it adds to the length of your tip section has to be accounted for at this stage). Once you have completed this you will have a little math to do. The first mathematical task will be to divide the designated length of the rod by the number of sections that it will be composed of. For the sake of this example we will be using a 3 piece fly rod that has a designated length of 8 feet. Since an 8 foot fly rod is 96", it can be divided into three equal sections that are 32" in length. Starting at the end of the tiptop guide that you just glued onto the tip section, measure 32" down the length of the tip section and put a dark pencil marking at this point (see Fig. 4).
|
|
|
Fig. 3: The tiptop glued to the tip section |
|
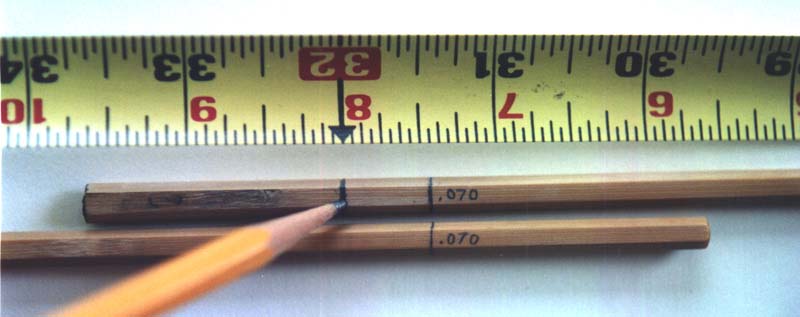 |
Fig. 4: Marking the tip section |
Next, while making certain that the tip section and mid section are still aligned according to their original taper station markings, transfer the line you just made on the tip section onto the mid section, as shown in Fig. 5. Measuring from this line, go 32" down the length of the mid section and make another dark pencil marking at this point. Again making sure that taper station markings are in alignment, transfer this marking onto the butt section (see Fig. 6). Measuring from this line, go 32" down the length of the butt section and make another pencil marking at this point.
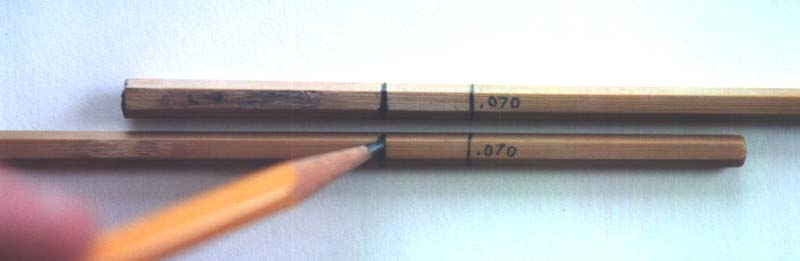 |
Fig. 5: Marking the mid section |
 |
|
Fig. 6: Marking the mid and butt sections |
|
What you now have are three rod sections that have been aligned and marked similarly to that shown in Fig. 7. Although you have arranged the rod sections in their proper taper orientation relative to one another, and the total length of the rod has been divided into equal thirds, you are not yet ready to begin any trimming. If you were to trim the rod sections now, dividing them into equal 32" cane blanks, the mid section would end up being longer than the tip section once the female ferrule has been glued into position, and the butt section would be longer than the mid section because the female ferrule used with the butt section is bigger and longer than the female ferrule that was used on the mid section. The main reason why this set of instructions calls for marking the rod sections into equal thirds is so that you can see how the location of these markings will differ from where each rod section actually gets trimmed.
 |
Fig. 7: The three rod sections in proper orientation to each other |
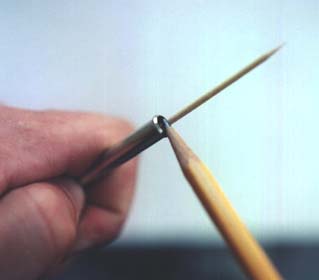
To avoid any inequality in the length of your rod sections, you must calculate where to position each of the two ferrule sets so that the rod sections will be of equal length when they are disassembled. To begin this process, you must first determine the seating distances of each of the two female ferrules you will be using on your rod. Do this by inserting a toothpick (or depth gauge) into each of the female ferrules and marking it, as shown in Fig. 8. Next, use your dial calipers to take a measurement reading from each toothpick. Since the ferrule used for the tip/mid connection is shorter than the ferrule used at the mid/butt connection, you will have two different ferrule seating measurements for a three piece rod. For the sake of this example, let’s say that that the tip/mid ferrule has a seating distance of .600", and the butt/mid ferrule seats at .900". The combined total ferrule seating distance for this rod would be 1.500". What this means is that when the rod is disassembled the total length of each rod section added together will be 1.500" longer than the length of the rod when it is assembled and the male ferrules have been seated within the female ferrules. In order for each of the three rod sections to be of equal length when they are disassembled, this extra 1.500" must be equally divided among each of the rod sections. Consequently, the finished length of each section must be 32.500", rather than the 32" we had calculated earlier.
|
|
|
Fig. 8: Measuring the depth of a ferrule |
|
The easiest section of the rod to calculate the length for is the tip section. This is because a tip section bears only a male ferrule, which does not add anything to its overall length (other than the thickness of the moisture sealing cap at the end of the male ferrule itself, but this dimension should be no more than several thousandths of an inch). Since we have already determined that each of the sections of this rod must measure 32.500" after the ferrules have been installed, we simply use a pencil to make a mark .500" below the line we had penciled in earlier at the 32" point on the tip section (see Fig. 9). Once this marking is made, you can proceed to trim the tip section to this 32.500" length.
|
|
Fig. 9: Adding .500" to the length of the tip section |
You are now ready to begin calculating where to trim the mid section, which is somewhat more complicated due to the manner in which the addition of a female ferrule will effect its length. Start by making a marking .500" below the 32" marking you had previously made at the tip end of the mid section (see Fig. 10), and trim the mid section at this point. Trimming the mid section at this point causes the taper of the mid section to correspond to that of the tip (since we added .500" to the length of the tip prior to trimming it). If the tip section and mid section were to now be placed end-to-end, they would both be the same taper diameter at the point where they abut with one another.
 |
Fig. 10: Subtracting .500" from the mid section to bring its taper into correspondence with the tip section |
Since we will be adding a female ferrule to the tip end of the mid section, we know that the ferrule will add .600" to its overall length, since .600" was the seating distance for the tip/mid female ferrule that we had measured earlier. This means that in order for the mid section to be its requisite 32.500" in length after the female ferrule has been glued into position, the mid section blank will have to be trimmed to a length of 31.900" (since 31.900" + .600 ferrule seating distance = 32.500"). So, measure down the length of the mid section 31.900" from the end you had just trimmed off, and place a marking at this point (see Fig. 11). Because we have already trimmed .500" from the tip end of the mid section, this mark should end up being .400" below the original 32" marking you had made earlier at the end of the mid section. Trim the mid section at this point. You now have completed the trimming process for the tip and mid sections of the rod.
|
|
|
Fig. 11: Marking the mid section to a length of 31.900 inches |
|
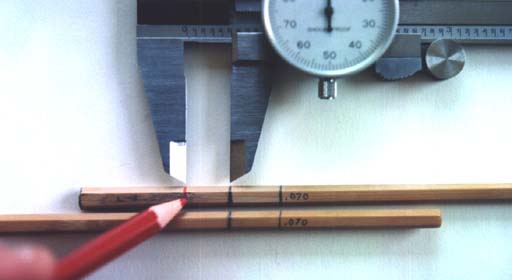
To complete the project by trimming the butt section, make a mark .400 below the original 32" marking at the tip end of the butt section, or simply line up the mid section and butt section according to their taper station markings and place a marking on the butt that corresponds to the trimmed end of the mid section (as shown in Fig. 12) and trim at this point (trimming the butt section at this point causes the taper diameter of the butt section to correspond to that of the mid section). Since we know that the female ferrule that will be glued onto the butt section will add .900" to its length, we are able to determine that the butt section must be trimmed to a length of 31.600" so that the addition of the ferrule’s .900" seating distance will bring the overall length of the butt section to 32.500" (since 31.600" + .900" = 32.500"). Measure 31.600" down the length of the butt section and trim at this point.
|
|
|
Fig. 12: Marking the tip end of the butt section to length. After trimming off this end, you will have to measure down the length the butt section to make the final trim marking (at 31.600") |
|
Prior to mounting the ferrules, you should measure the thickness of the moisture caps on your ferrules and subtract this from the length of each section by sanding it off of the ends of the blanks where the ferrules will be positioned at. Be sure to round over the edges of your trim cuts at the ends of each blank prior to sanding, to avoid any splintering or tear out. You could also have subtracted the thickness of the moisture cap when you did the original trim cuts (this would be the best way to do it, but I did not do it this way in this example in order to preserve clarity). Once the ferrules have been mounted, compare the lengths of the three rods sections to one another. They should be the same length. You should also assemble the rod at this point and check to see that it is its designated length.
The butt cap at the end of the reel seat will add an additional 1/16"-1/2" to the length of the butt section. Calculate how much the particular reel seat you are using adds to the overall length of the butt section, and trim the butt accordingly. Once the reel seat is glued in place each of the rod sections should still be the same length as one another. You now are ready to complete the rod by attaching the guides. Remember to keep in mind that for this example I was assuming the use of an 8 foot rod that had ferrules with seating distances of .600" and .900". The measurements you will be dealing with for your own 3 piece rod will very likely differ from the numbers used in this example. Also, if you are cutting rod sections to length for the first time, you might refrain from doing any actual trimming until all of the sections are marked. This will allow you to line everything up and see if it is correct before you have committed to doing any cutting.
End
|
|
|
|
This site created and maintained by Thomas Penrose
| For more detailed information on split cane fly rod making, look at these books: |
| A Master's Guide to Building A Bamboo Fly Rod, by Everett Garrison with Hoagy B. Carmichael. |
| Handcrafting Bamboo Fly Rods, by Wayne Cattanach. |
| How to Make Bamboo Fly Rods, by George W. Barnes. |
Fundamentals
of Building a Bamboo Fly-Rod, by George E. Maurer and Bernard P. Elser |
| Constructing Cane Rods: Secrets of the Bamboo Fly Rod, by Ray Gould |
| Splitting Cane: Conversations With Bamboo Rodmakers, by Ed Engle |
| The Lovely Reed: An Enthusiast's Guide to Building Bamboo Fly Rods, by Jack Howell |
| Cane Rods: Tips & Tapers, by Ray Gould |
All images and text copyrighted ©Thomas Penrose 1998, 2001