How
to Solder Copper Plumbing Pipe / Fittings. |
(How
to Sweat Copper with a Propane Torch) |
|
|
|
Using copper
for water supply pipe for your home offers some advantages over threaded
galvanized iron pipe. Threaded pipe can be difficult to work on because
once the system has been all threaded together, it is more difficult to
make additions or changes to it (you can’t just unscrew a section
of pipe once it has fittings already threaded to each of its ends, since
turning the pipe one way to unscrew it causes it to screw in tighter on
its opposite end). With copper, you just cut out a section using a simple
tool (see below), and solder in a new section. Soldering, when done correctly,
also makes leaks a very rare occurrence.
In addition to being easier
to work with, copper pipe has a longer life than galvanized iron pipe,
which will inevitably rust from the inside out. This rust tends to clog
faucet aerators and valves with its debris, and will eventually cause
the pipe to develop leaks or to break. |
|
|
|
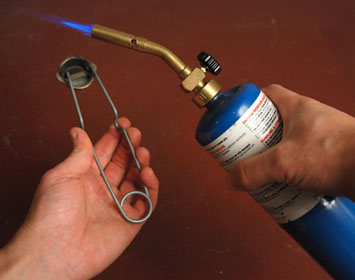
The
propane torch is the primary tool used to solder copper fittings (soldering
copper pipe is also referred to as "sweating copper pipe").
Shown here is a typical torch that has just been lit with the pictured
flint torch lighter (using this type of inexpensive lighter is safer and
easier than using a match or butane lighter). You can often buy a torch
similar to the one shown as part of a kit that includes soldering wire,
flux, a lighter, and some other accessories. Once the propane cylinder
is empty (they last for a very long time), you simply screw the brass
torch head to a new propane cylinder. For more money, you can buy a torch
head with a built in ignitor, which is quite convenient. NOTE: Avoid using
MAPP gas for soldering. It burns hotter, and while some professional plumbers
prefer it, it cannot be used to much advantage by the amateur.) |
|
|
|
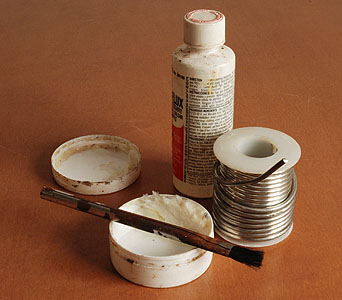
Flux
and soldering wire is also used with the torch when soldering. The two
types of flux most often used for sweating copper pipe are paste flux
and liquid flux. The purpose of applying flux to the copper fittings is
that it cleans away the oxidized coating on the metal and allows the liquid
solder to flow and bond to the surfaces. I prefer the use of liquid flux,
but sometimes it can be hard to find depending on where you live. An inexpensive
flux application brush is used with either kind of solder. Be sure to
buy flux and soldering wire that is intended for residential copper plumbing
(it is the most commonly available type, so it will not be hard to find).
|
|
|
|
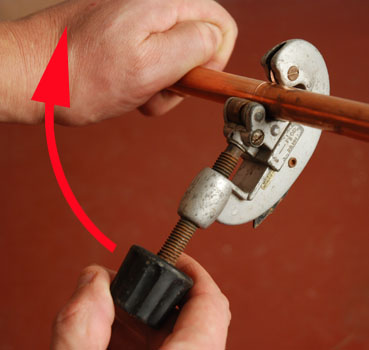
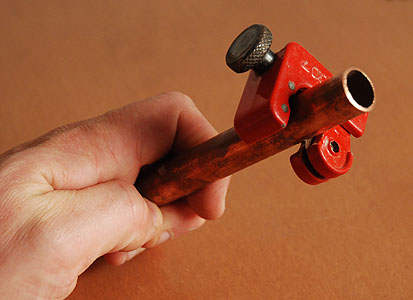
The
most physically demanding part of soldering copper is cutting the pipe
sections. Although I might add that this is by no means as physically
demanding as working with pipe wrenches and galvanized threaded pipe.
The tool shown has a cutting disk that scribes the pipe as the tool is
rotated around the pipe (in this image you can just make out the bright
line where the cutting wheel is biting into the metal). After a couple
of rotations, the knob at the bottom of the tool is tightened slightly,
driving the cutting disk a bit more deeply into the copper, and then the
tool is rotated again. This process is repeated until the pipe finally
snaps apart. The amount of time it takes depends on how tightly you rotate
the knob -- the tighter the knob, the deeper the cutting wheel bites and
the harder it is to rotate the cutter around the pipe, but the faster
it cuts. |
|
|
|
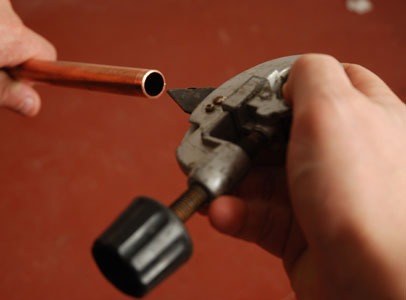
Once
the cut pipe snaps apart, you want to de-bur its inside edge using the
deburing blade on the cutting tool. Simply stick this triangular blunt
edged blade into the pipe, and forcefully rotate the pipe and the tool
to smooth out the turned-in bur of copper that resulted from the cutting
process. This reduces the chance of turbulence and noise developing within
the pipe as water is flowing through it as part of your plumbing system. |
|
|
|
If
you need to work on pipe that has already been installed in a house, a
second pipe cutter like this is often a necessity. It works on the same
principle as the one illustrated above, but it is smaller so that it can
fit into tight places, such as when you need to cut a copper pipe that
is running through a stud wall or close to a floor joist. In those instances,
using the larger cutter would be impossible because there is not enough
room for it. The advantage of the large cutter is that its bigger size
offers far more leverage, making it easier to use. If you use one of these
small cutters for an extended time, you will find that your fingers get
quite sore from rotating it around the pipe so that the cutting wheel
can do its work. |
|
|
|
|
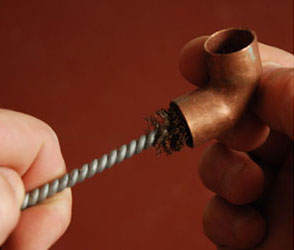
Wire brushes made specifically
for cleaning copper pipe can also be useful, although not essential,
especially if you are using fairly new copper fittings that have been
stored in a relatively clean environment. Older, dirtier pipe and fittings
that have a heavy layer of oxidation on them can benefit from the use
of wire brushes though. The brush shown is one designed for cleaning
the inside of copper fittings, but there are ones made for cleaning
the ends of copper pipe as well.
|
|
|
|
| |
|
|
|
| |
| |
| The informational
content of this how-to website is not warrantied in any way or form, and
any use of said content are at the reader's own risk, the author shall not
be held responsible in any way for any damages or injuries arising from
the content of this web site. Common safety practices are encouraged at
all times, and the proper and safe use of all power tools and safety equipment
(eye goggles, etc.) is the responsibility of the user. Additional How-To
articles Here. |
| |
Copyright
2008 Thomas Penrose |
|
|
|
|
|
|
|
|